
Summary
Description
At the end of the financial year, you need to run the year end procedure. This procedure is automated. It prepares your company for processing in the new financial year.
To help simplify the year-end procedure, our year end checklist provides a comprehensive list of steps businesses should follow to minimise the stress and uncertainty around this process.
By following these steps, businesses can ensure that they are fully prepared for the year end close and that their financial records are accurate and up-to-date.
Resolution
We have divided the steps according to before, during and after the year end procedure for your convenience.
 NOTE: After each step we list issues you might receive and provide solutions for these. We have used collapse to make the content easier to read. You will need to click on each step to expand and see more details.
STEP 1: Prepare to run your year end
Follow the steps below to ensure your company is ready to run year-end procedure.
Update open batches and place documents on hold
You cannot process the year-end if you have open batches on your system. However, quotations, sales orders, purchase orders and documents that are on hold in Pastel Accounting will not prevent the year-end from running.
 CAUTION: Documents that are on hold in Pastel Point of Sale will prevent the year end from running.
You will need to update all open batches that prevent the year-end from running. To access and update these batches follow the steps below
- Select View...Open Batches to open the Open Batches screen
- Select the open batch, click on the Jump To button to open the relevant batch
If the batch is POS batch and it's on hold or COD, the user
needs to open the POS application and update the batch. - To update the document batches do the following:
-
Click the Batch button and choose the Update option -
The Update Batch window displays -
Click the Update button
-
- To update journal, cashbook, inventory journal batches do the following:
- Click on Update but on (journal & cashbook) or Update Batch (inventory journal)
- Follow any prompts and click Update button
- To update Point of Sale batches do the following:
- Open the company on POS and login as POS Supervisor
- Click on Process…Update All Documents
- Ensure that you have processed Supervisor Cash Up for users that show they require POS Cash Up under open batches in Xpress/Partner
- Click on Process…Supervisor Cash Up
- Select the user, enter user amount accordingly and Finalise Cash Up
CAUTION: Please do not make any changes to the file Documents.mdb using Microsoft Access or the “tblDocumentHeader” table using SQL Server Management Studio without confirming with our Support Team.
Process Count Inventory ( Year End Stock Take)
You should think about open batches that use inventory quantities, such as customer sales, supplier purchases, and inventory adjustments:
- If possible, update these batches first, If you do not do this, and you change any items in the batch to have a quantity less than the quantity in the batch, you can end up with negative quantities on hand.
- When you start this function the system asks whether to rebuild batch quantities. If you have open batches, this process double-checks that the batch quantities are correct.
You then halt all further physical and theoretical movement of quantities for those items you are working with.
- Select Process..Count Inventory
- You will receive a message to rebuild the batch quantities as shown below, select Yes
- The Data Integrity Assistant will open with the option to Rebuild Batch Quantities Only selected, select Process and then Finish once complete

Performing an Inventory Snapshot
The Snapshot takes a ‘picture’ of the quantities in Sage Partner/ Xpress; this is theoretical quantities.
 TIP: If you make use of Multi Stores you will have the options to select ‘From Store’ and ‘To Store’
- Select the range of items you are including in your Snapshot, You can select the following categories: Inventory Code, Inventory Category, Bin Number or Barcode.
- Click the magnifying glass to select the item range you would like to include in the Snapshot. If you wish to take a Snapshot of all your items, leave the From field blank and the To field filled with zzzzzzzz.
- If you use Serial Numbers, you can choose whether to take a snapshot using Serial Number Items Only or Non-Serialised Items Only.
- Make your selection and select Next, select Process to confirm the operation
- Depending on your selection you will receive a message indicating the number of items included in the snapshot. If all your items have been selected the message will display All items have been Snapshot
- Select Continue to proceed with the stock take
- The first option is to Print a count sheet. This is usually printed to write down the quantities physically counted. Once you have counted your physical quantities you will need to enter these quantities into Sage Pastel Accounting
- Enter the quantity for each item under the Quantity column
- Press the Enter or Tab key to move to the next item, when completed, select to proceed NOTE: Items that show in red are either service items that cannot be counted or items that have not been included in the Snapshot.
- If you selected the option to Import a text file which contains the physical quantities on hand Please refer to the Sage Pastel Accounting Help File
- Select Help...Pastel Help
- Select the Index tab and type in Count Inventory
- Double click on the Count Inventory topic. The Count Inventory Information will display on the right-hand pane. Select Importing quantities hyper link (Underlined and displayed in blue)
- Once your quantities have been captured, select the option to Print a count variance report
- The count variance report will show the difference/ variance between the theoretical and physical quantities per item as well as the unit and total costs.
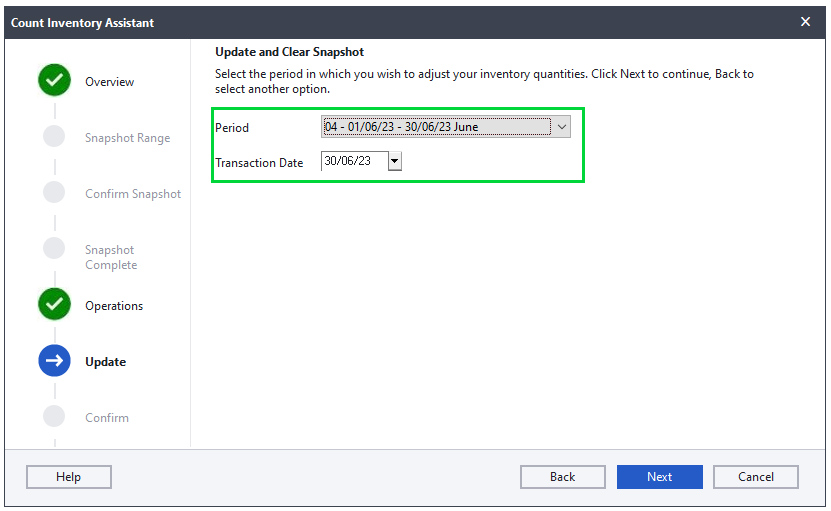
- Update any differences between theoretical and physical quantities, and clear the snapshot should be selected when the stock take has been completed
- Select the period you wish to process the Stock Take/ Count Inventory
- If this is your Year End Stock Take/Count Inventory select period 12 to ensure the stock take is completed in the last period of your financial year
- Select Next and Finish to complete the stock take
Process Foreign Currency Revaluation (if using Multi-Currency module)
Follow steps below to process Foreign Currency Revaluation.
- Select Process...Foreign Currency Revaluation
- You can run the revaluation on foreign customers, suppliers, cashbooks or a combination thereof, make your selection and select Next
- Select the correct period for the revaluation
- Select Edit Exchange Rates
- Select the drop down menu at the top left side of the screen. Select each currency and make sure the exchange rate for each currency is setup for the period the revaluation is run for. You can check and/or enter the current exchange rates.
- Select OK when completed
- Type in a Starting Reference that will be linked to the transactions when the revaluation is run
- Select Next to proceed
- The Foreign Currency Variance Report can be printed before the process is finalised. This is a preview of the revaluation and the adjustments that will be made CAUTION: It is recommended that the report is looked at to ensure the revaluation will run correctly. Once the revaluation is run, it cannot be reversed except by restoring a backup.
- Select Next. The confirmation screen will appear. Ensure the information displayed is correct, select Process to complete the revaluation
Create a Retained Income Account
If this is the first time you are running a year end, ensure that you have created or have a retained income general ledger account. The system posts the profit or loss for the year to this account.
- Select Edit...General Ledger...Accounts
- Select the Magnifying Glass
- Ensure there is an account with Financial Category Retained Income

- If there is more than one Retained Income account, one of these accounts must be deleted
- Should there not be a Retained Income account, select the New Icon
 to create a new Retained Income Account
 - Type in the Account Number the most common is 5200/000 or you can use desired account number
- Type in the Description Retained Income Account
- The Main Account will be a Balance Sheet Account and the Financial Category will be B15 Retained Income
- Select the Save option once complete
Setup 13th period
The system offers a 13th period for two exclusive reasons:
- Some organisations process 13 four-week periods in a year.
- You can use period 13 as period one of the next year.
The latter option lets you work in the next year while you finalise the current year. When you run the year-end procedure, the last period transactions and balances become the transactions and balances in the first period of the next year.
NOTE: This step is not mandatory. Setting up a 13th period is optional and normally only done if you wish to extend your financial year to allow you to continue processing while finalising your year end.
Follow the steps below to create 13th period.
- Select Setup...Periods
- Change the Number of Periods to 13
- Select the option Use Last Period as the First Period of the Next Year
NOTE: Processing will take place in the 13th period. When the Year End process is complete, all the processing in the 13th period will be moved to the first period of the new financial year.
CAUTION: If you are running 12 periods you should NOT select the option 'Use Last Period as First Period of Next Year'. This option moves all the transactions for the last period to the first period of the new financial year.
Not going as expected?
Check below steps you can take to troubleshoot and resolve the issues before year end procedure.
Open batches message when trying to run year end
You might get messages as below about open batches.
- Open batches containing serialised items have been found when running the Count Inventory
- The year end procedure will not run if you have any open batches
Ensure all open batches have been updated. Refer to the step above "Update open batches and place documents on hold" for assistance with open batches.
There might be open batches for users that have been deleted. You do not need to recreate these users so that you can see the open batch under Open Batches screen. This is because when you go to View...Open Batches, you will get message as below. Click Yes, for the batch to be copied to current user. 
Once the batches has been copied you can access these batches and update or delete the batch.
CAUTION: If you delete batch for documents e.g. tax invoice, you still need to update the documents batch to clear the open batch message.
Deleting batch files from the company folder
If you still get the error you can delete open batch files for cash book batches, journal batches and inventory journal batches from the company folder as per steps below.
- Press the Windows and E keys found on your keyboard simultaneously
- Double click on the company folder to display the data fi les
- Look for the following fi les in your company, right click and delete them (where XXX represent the user number)
- ACCBTN.XXX
- ACCBSJ.XXX
For POS open batches, ensure all open batches have been updated. Refer to the step above "Update open batches and place documents on hold" for assistance with open batches. If you still get error, there might be POS documents that are on hold or COD. To update documents that are On Hold and COD transactions do the following:
- Click on View…Batch Listing to check for documents that are on hold or COD
- If the user does not have access to the View menu, give user access to be POS Supervisor temporarily as illustrated below. CAUTION: Please ensure you deselect this after updating the POS open batches for the user.

- Select Tax Invoice on Document Type when viewing the Batch Listing report
- The report will show which tax invoices are on hold or COD and for which customer as illustrated below.

Follow steps below to access POS COD or On Hold transaction and update it.
- Log into POS as the user that processed the COD or On Hold transaction. Once in the program, go to Process…Point of Sale, if you are not taken to the processing screen automatically.
- Click on the Edit button.
- Select the document type that you would like to edit from the Search Types drop down list. A list of invoices will display. Click on the invoice and click on Select. CAUTION:
If the documents do not show after clicking Edit, close the Search screen, click on <F9> On Account, select customer account with on hold or COD document as per report above and the click Edit. If there is more than one customer you will need to do this for each customer account. - The invoice will display on your screen. Deselect the option On Hold or Cash On Delivery by clicking on the Place on Hold or Cash on Delivery tab. You can then complete the transaction and print if required.
- Then go to Process...Update all Batches. Click on Start and all the invoices will be updated and will not show on the Open batches screen.
- The documents should now show. You can also change the document type from On Hold to COD. You can the take the document off hold or off COD and update the documents as per above steps.

If the error persists it could be due to corruption in the General Ledger Parameter file. The errors can be fixed via Data Fix. The Data Fix can be done by a Certified Pastel Dealer that specialize in data fixing or Log a ticket with support for assistance to upload the data for a Data Fix.
The first thing is to ensure that you are selecting the correct filters when running reports to check if inventory count quantities were updated correctly.
We recommend that you print the count variance report when processing count variance. You can print the count variance report from the Count Inventory Assistant.
NOTE: Ensure you select all items and all store when printing the report.
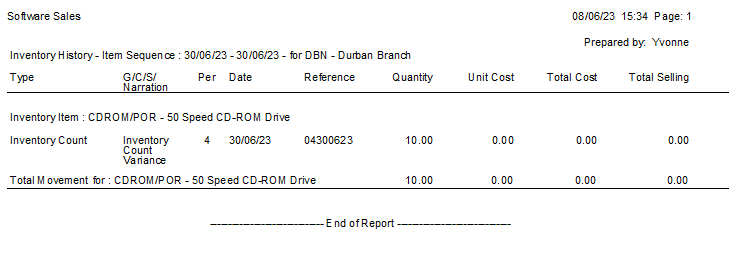
The report will show as below with the count variances. These are the quantities that will will show on the Inventory History Item Sequence report under Transaction Type Inventory Count.
NOTE: A variance of 0.00 will not be posted.
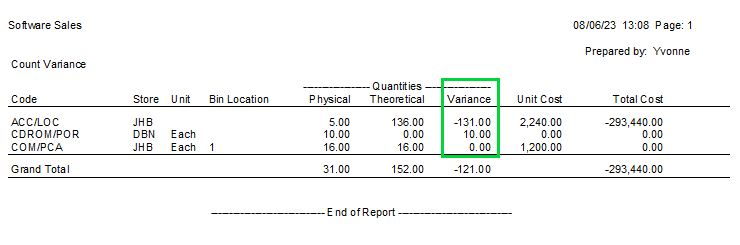
Also take note of period and date that you wish the quantities to be adjusted in. This is the date that you need to select when viewing the Inventory History Item Sequence report to check if quantities were updated.
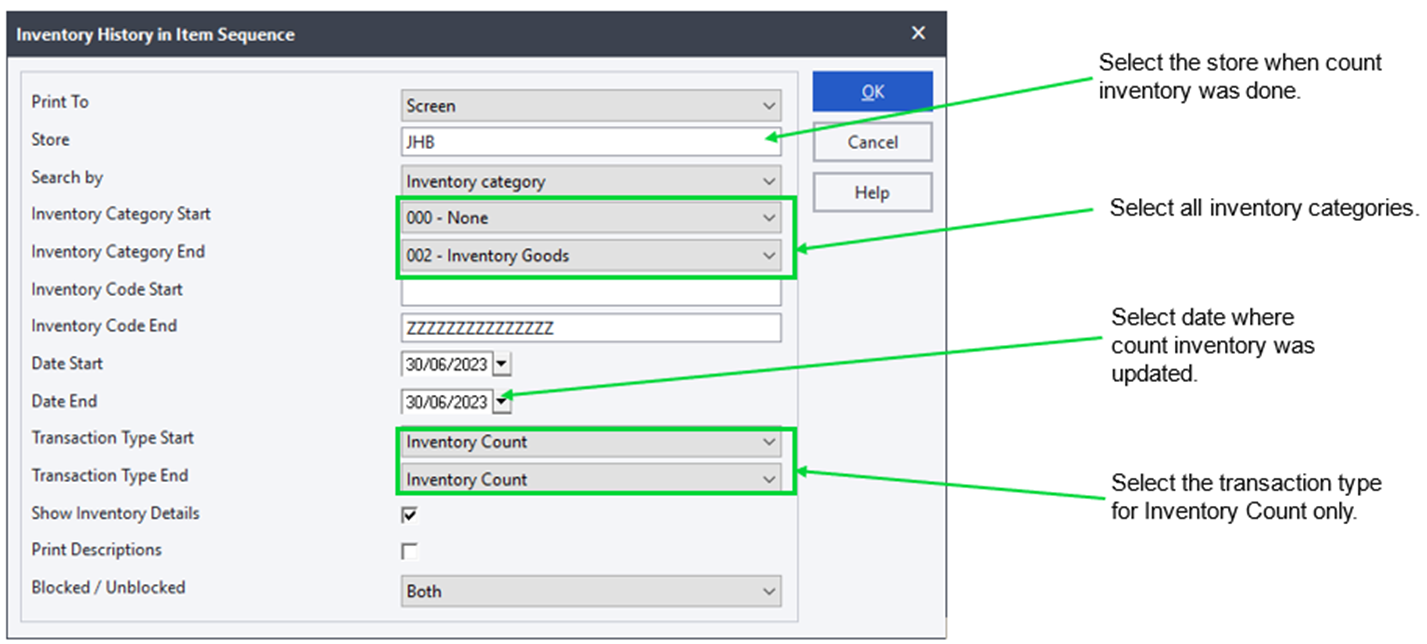
Next you will need to view reports after processing count inventory.
You will need to view the Inventory History Item Sequence report by going to View...Inventory...History...Item Sequence menu option to check if adjustments were processed and updated. You can print the report using the options as illustrated below.
The report will display as below with the quantities that showed on the count variance report.
NOTE: If the variance was 0.00 on the count variance report no transactions are posted and will not show on this report.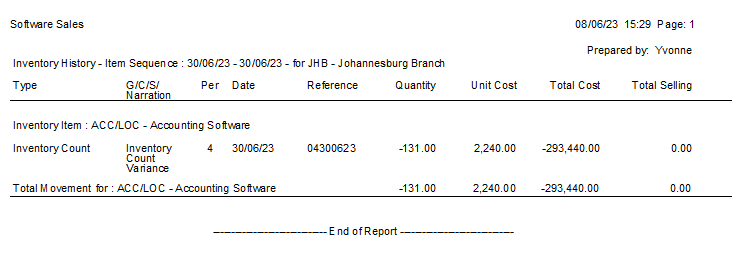
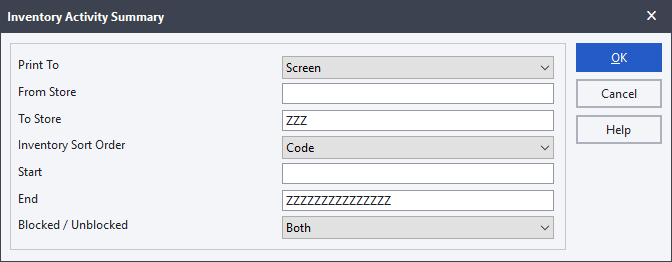
If the inventory count transactions are showing, you will need to view the Inventory Activity Summary Report by going to View...Inventory...Activity Summary menu option to check if adjustments were processed and updated in the correct period. You can print the report using the options as illustrated below.
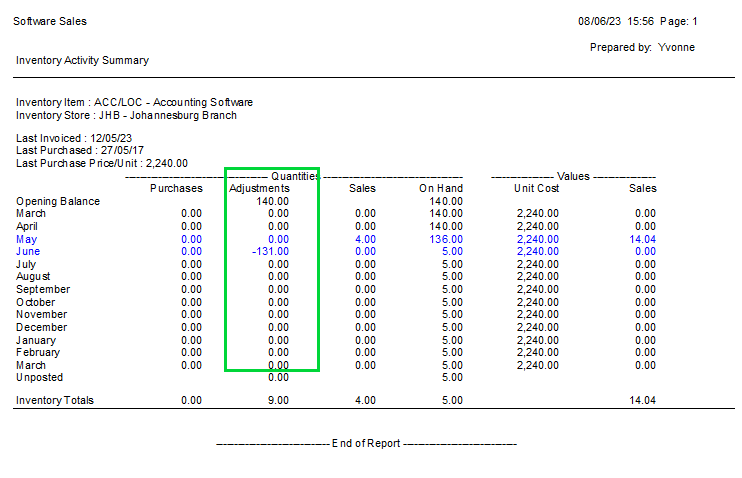
The report will display as below with the adjust quantities for each period. You can drilldown to get more details.
If the inventory count transactions are not showing, you will need to clear the snapshot and run stock fix.
- Process backup of the company
- Select Process…Count Inventory
- Select Yes to rebuild batch quantities
- Follow the prompts to rebuild the batch quantities
- After rebuilding batch quantities, select Clear the snapshot without updating inventory quantities and click Next
- Click Process and Finish
- Close Sage 50cloud Pastel Accounting
Refer to article How to use the stock fix utility? for steps on how to run stock fix.
After running stock fix successfully, you can reprocess count inventory again. If you still have issue Log a ticket with support for further assistance.
Data Integrity Errors
When running the Data Integrity, you may receive an error report showing errors e.g Verify Balances and Transactions.
If you get the error that there are missing accounts as shown, you will need to recreate the missing customer, supplier or general ledger accounts. After having created the account, run the data integrity again because, the process was stopped when the missing accounts were detected.

The errors can be fixed via Data Fix. The Data Fix can be done by a Certified Pastel Dealer that specialise in data fixing or Log a ticket with support for assistance to upload the data for a Data Fix.
Financial periods are not compatible with the Tax Manager when trying to setup 13th period
Changes made to the financial periods are not compatible with the Tax Manager when trying to setup 13th period
Should you wish to change your Financial Year and getting the below error when you are busy changing your periods you would need to Log a ticket with support for assistance as the solution will differ for each company.

STEP 2: Run your year end
A step-by-step guide to run year end and you're set for the new year.
Follow the steps below to run the year-end procedure
CAUTION: The year end procedure should be done on the server if using multi-user setup.
- Ensure all users have closed Pastel and process backup
- Select the Change...Year End menu option
- Click Next
- The Copy Company screen displays If you wish to make a copy of the company, choose the create option and give the company a name. You could give it a similar name to the existing company but with the year appended. You can then choose whether to run the year-end in the current company or in the new (copied) company.
If you do not wish to create a copy of the company, choose the Do Not Create option. CAUTION: If you use Xpress Start-up or Point of Sale SQL Version you can select option to Create a new company but you should not select Run the Year End in the new company. See below important notes on why you cannot do so:
- Xpress Start Up is limited to 1 user and 1 company only.
- For Point of Sale SQL Version if you run year end in new company a new empty database will be created for POS and it will not have historical information and POS settings.
- Click the Next button to continue. NOTE:
If you have selected option to create a new company, you will get message as below suggesting that users change passwords to prevent processing under the wrong company. This is optional.

- The Print Reports screen displays to remind you that you should have printed reports. If you have done so, click the Next button to continue.
- The What the Year End Does screen displays and outlines what the procedure will do. Click the Next button to continue.
- The File Backup screen will display. If you select to Cancel or Close the backup screen without doing a backup, the system will log an entry in the Systems Audit Trail report under the category Backup.
- The Confirm Operation screen displays. Click the Process button to perform the year-end.
Not going as expected?
Check below steps you can take to troubleshoot and resolve the issues during year end procedure.
The number of This Year Periods and Last Year Periods are not the same
The error can come up for example when you have 13 periods under last year and the dates for 13th period last year is same as first period this year. You will need to Log a ticket with support for further assistance.

Runtime Error 53
This error will occur when running the Year End over a network or there are missing files needed to run the Year End.
NOTE: Make sure you run the Year End for the server machine.
To check if the company is accessed locally:
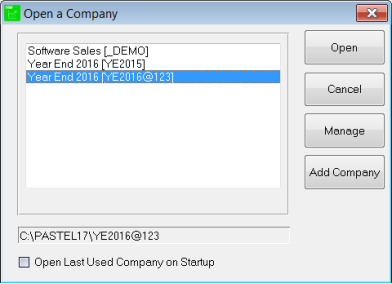
- Select File...Open, the Open a Company screen will display
- Select the Company ensure it is highlighted in blue, at the bottom of the screen verify the company path, this should point to local path e.g.
C:\Pastel19
If you are running the year end on the server and the error occurs then, please follow the steps below.
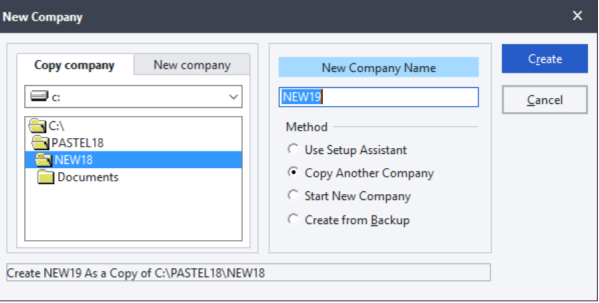
Create a copy and run year end on the copy company. To create a copy company, please follow the steps below.
- Go to File...New
- Click on the option Copy Another Company in the Method block.
- In the New Company Name field provide the copy company with an appropriate name. Remember this copy company will be the new company that is normally created when going through the year end process. Therefore please give the file an appropriate name that represents the new financial year. Please find example below illustrating the options that should be selected.

- Click the Create button to create the company. The system creates the new folder and copies the company data from the original company.
- Once the copy (new) company has been made. Please go through the year end process again in the copy (new) company. On the Copy the Company to Another Company screen, please select the option Do not create a new company option as shown in the example below.

Runtime Error 70 and Runtime Error 75
These errors occur when something is blocking the Year End process.
- Ensure the user is a Windows Administrator
- Ensure that the Year End is run on the Server
- Make sure the company is sitting directly to the Pastel folder
- Remove the read only attributes from the company and Pastel folder
- Ensure all POS users are logged out of the company and POS is closed on all machines
To check if the company is accessed locally:
- Select File > Open, the Open a Company screen will display
- Select the Company ensure it is highlighted in blue, at the bottom of the screen verify the company path, this should point to C: Pastel17/18/ Xpress17/18
Permissions on the Company folder:
- Press the Windows and E keys found on your keyboard simultaneously
- Double click on the C: Drive
- Double click on the Sage Pastel Xpress/ Partner folder
- Right click on the company folder and select the option Properties. Ensure the Attributes are remove
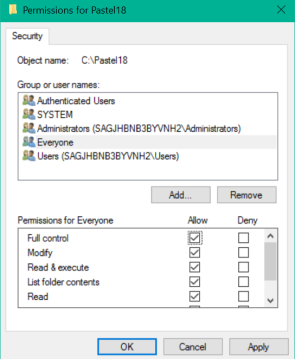
- Select the Security tab on top, select each Group or user name under Group or user name, ensure the Permission is set to Full Control
- Should you still receive the error message, you can add a user Everyone
- Select Add, type in Everyone, select OK
- Ensure Full Control is selected
- Select Apply and OK
Full Control added to the Pastel folder:
- Press the Windows and E keys simultaneously, browse to the Pastel folder
- Right click on the Pastel17/18/Xpress17/18 folder, select the option Share With > Specific People
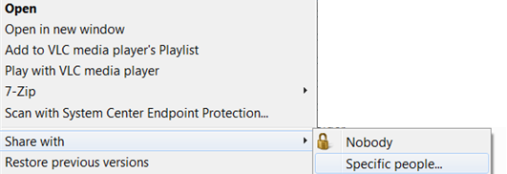
- Type in Everyone, select Add
- Change the Permission Level for Everyone to Read/Write by selecting the drop down
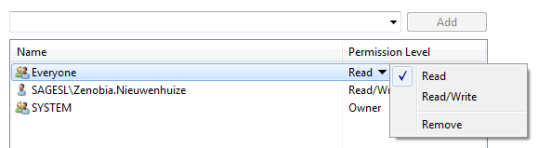
- Select Share and then Done to complete the process
Runtime Error 5 When Opening a Company
This error occurs when the company folder name exceeds 8 characters or there is a special character in the company folder name
To check the Company Folder Name:
Select File...Open, the ‘Open a Company’ screen will display, search for your company and look at the name in brackets, this is the folder name, this folder should not have more than 8 characters or any special characters e.g. $ # * & %@ !
Correcting the company folder:
- Select File...Open, click on Manage button, select the company
- Select Remove Company and close Pastel
- Press the Windows and E keys found on your keyboard simultaneously
- Double click on the Xpress17/18/Pastel 17/18 folder
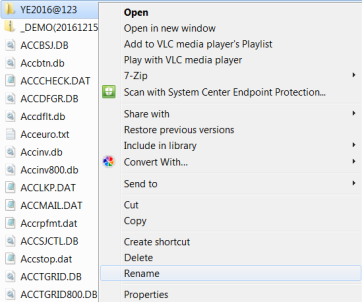
- Right click on the company folder, select Rename, remove the special character or reduce the number of characters
Adding company with correct folder name
- Open Sage Pastel Xpress/ Partner
- Select File...Open, click on Manage button
- Select Add Company, browse for your company
- Double click and select OK
- Select Close, log into your company and run the Year End
Runtime Error 6
Please follow the steps below to resolve the error
Rebuild the ACCTRN.DAT, ACCMAS.DAT and ACCOI.DAT files through the Rebuild Utility.
Refer to article How do I rebuild a Btrieve file using the Rebuild Utility on how to
If the error persists after the rebuild, please run a Data Integrity test
- Go to File...Data Integrity
- Select Next
- Select Verify the Data Only
- Select Process
If there are any errors on the Data Integrity, the data needs to be fixed by our Data Fix team. Log a ticket with support.
The turnaround time is 24 to 48 hours excluding weekends and holidays from the time the data is received.
![]() NOTE: No processing can take place while our team is fixing the data.
NOTE: No processing can take place while our team is fixing the data.
If there are no errors, please follow steps below
- Go to File...New
- Select Copy Another Company
- On the left-hand side ensure the company you want to copy is highlighted
- Type a name in the New Company Name field to provide a name for the copy company
 NOTE: This Copy company will be the company that will be used to do the Year End. Please ensure this folder name is appropriate for the new financial year.
 - Select Create, to create the company
- Select File > Open
- Select the copy company (example: NEW19) to open
- Select Change > Year End > Next
- Select Do not create a new company
- Select Next > Process to complete the Year End
STEP 3: Housekeeping tasks after running year end
Follow the steps below to ensure the year-end procedure was completed successfully.
Check if financial periods are correct
After processing year end ensure that the roll over to the new financial year was successful and financial periods have been setup correctly. To do this follow the steps below:
- Select the Setup...Periods menu option
- The Setup Periods screen will display

- Verify the Start and End dates, these should display the new financial periods/ year. Also ensure the dates are correct on all periods for last year. NOTE: The End Date of each period and the Start Date of the next period are consecutive days.
- Select OK
CAUTION: Should the periods be incorrect, restore the Year End backup and re-run the Year End.
Select correct period and date on documents hold
Once year end procedure is done all documents that are on hold will have the period set under new financial year's first period. Please ensure that you select the correct period and date in the new financial year before updating these documents to avoid out of period processing.
You need to open each document and select the correct period and date as shown below.

Activate new company on workstations
Follow steps below to activate a company on a workstation
- Click File…Open from the Pastel menu
- Click Manage
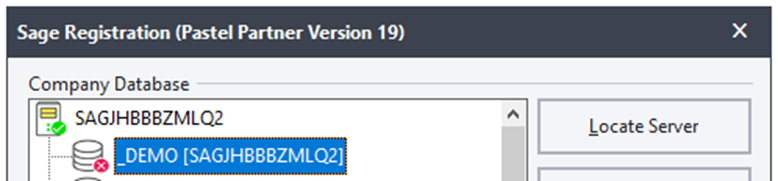
- On the Company Database screen, all the companies will be listed, companies that have red crosses next to them will have to be activated
- Click the company that needs to be activated and click Activate Company, click the drop down and browse to your mapped drive
- Double click on your company and click OK
- The registered server will appear in brackets, this is the computer that holds the companies
- On the Open a Company screen all the added companies will show
- To open a company, ensure it is highlighted in blue and then Click Open, you will be prompted to enter your password.
If you selected option to create new company and run year end in new company, we recommend that you deactivate the old companies on workstations.
To deactivate a company on a server:
- Select the company.
- Click the Deactivate Company button.
- The system shows the company with an inactive icon.
Locate new company for Debtors Manager SQL Version
If you are using Debtors Manager SQL Version and you selected option to create new company and run year end in new company, you will need to change the location of the database to point to the new company.
To change the location of the Database:
- Open Debtors Manager
- Ensure that you open last year’s company
- Click on File…Locate Pastel Company File
- The Open a Pastel Company screen will display:
- Click on Browse
- Navigate to the new company folder created after Year End

- Click OK
- Enter password if prompted
- Click on Refresh...Refresh all data now

- Click Yes to continue

The data will be refreshed and will be ready for users to continue and the notes entered before year end should still be available.
Not going as expected?
Check below steps you can take to troubleshoot and resolve the issues after year end procedure.
Incorrect financial periods
You need to restore backup that was done before processing the year end and process year end again.
Follow the steps below to restore backup.
- Log into your company on Sage Pastel Accounting
- Select File...Restore menu option to restore data
- Sage Pastel will automatically pick up any backup that has been created on the computer or on the external drives
You will be able to select the most recent backup due to the date and time stamp visible on the backup. If the backup is not in a .zip folder, it will not be visible in the Backed Up Files column
- Select the backup you wish to restore and ensure that the backup is highlighted in blue.

- Click Process to confirm the operation.
- You will receive a warning message if you are restoring from your local drive, click Yes to proceed with the restore process.

- You will receive another warning message, advising you that you will be restoring live data, click OK to proceed.

- Log back into the company and confirm that the necessary changes have been made to your data.
Errors detected on Data Integrity
You need to restore backup that was done before processing the year end and process year end again.
Follow the steps below to restore backup.
- Log into your company on Sage Pastel Accounting
- Select File...Restore menu option to restore data
- Sage Pastel will automatically pick up any backup that has been created on the computer or on the external drives
You will be able to select the most recent backup due to the date and time stamp visible on the backup. If the backup is not in a .zip folder, it will not be visible in the Backed Up Files column
- Select the backup you wish to restore and ensure that the backup is highlighted in blue.

- Click Process to confirm the operation.
- You will receive a warning message if you are restoring from your local drive, click Yes to proceed with the restore process.

- You will receive another warning message, advising you that you will be restoring live data, click OK to proceed.

- Log back into the company and confirm that the necessary changes have been made to your data.
Year End ran in wrong company
This error normally occurs when the client select the option to create a new company and forget to tick the option to run the year end in the new company.
During the Year End process you have the options:
- Create a new company
- Do not create a new company
- Run year end in the new company
If the Year End has been run in the incorrect company you have two options:
- Restore the Year End Backup and run the Year End again ensuring you select the option 'Run Year End in the New Company'
- You can change the company names around
Restore the Year End backup and re-run the Year End
- Restore your Year End Backup
- Re-process the Year End as per step 2
NOTE: Ensure you select the option to Run the Year End in the New company.
Change the Company Folder Names around
- Select File...Open...Manage...Add company
- Remove the companies where the Year End is wrong
- Navigate to the company folders
- Right click on the first company and select rename
- Enter the name of the other company folder with an a at the end
- Select the other company right click and select rename, rename it to the first company folder name
- Go back to the first company and select rename remove the a
- Open your Software and add the companies back
 EXAMPLE: Company A is called Demo2023 Company B is called Demo2024. The Year End was run in company A but it should have been company B. You will need to rename Demo2023 to Demo2024 and Demo2024 to Demo2023.
Prefer to see how? Watch the video below, on how to process year end.