

Summary
Description
Once you log in to your Sage Business Cloud Payroll (SBCP) on the 15th of April 2020 you will have a new Report option available, COVID-19 TERS. As there are some information that the system cannot provide, you need to manually capture this in the excel file before it can be converted to CSV. Please reach out to your Tax Practitioner if you need guidance on what these amounts should be.
Resolution
 NOTE: Please ensure that your employee's banking information, ID mumber, start date and if applicable termination date has been completed on Sage Business Cloud Payroll.
 CAUTION: This file exports per cycle and not per company and will include all employees except for Personal Service Providers, Independant contractors and labour brokers.
What to do in SBCP:
- Click on Reports
- Click on UIF – Temporary Employer / Employee Relief Scheme
- Enter a Shutdown From date
- Enter a Shutdown To date
- Select which employees you wish to include

- Click on the drop down for your Preferred payment medium and select either:
- Payment to Employee
- Once you have made your selection click on Preview
- As with any report in SBCP, you can now select to print this report to excel by selecting Xlsx from the drop down and then pressing the save Icon:

- You will now be able to save your TERS file as an Excel sheet to your Downloads folder or any preferred directory:

What to do on your Computer:
Make sure ALL other programs are currently closed on your machine.
- Click on Start
- Type in Control Panel
- Click on Region (Windows 8 and Windows 10) or Region and Language (Windows 7)
- Click on Additional Settings:

- In the Numbers tab, change the List Separator to | (Pipe)
- Click on Apply

- Click on OK
- You can now close the Region Screen
What to do on the Excel Sheet:
You can now locate and open the Excel Sheet that you just saved. You will have to:
- Complete the Sector Minimum Wage (Column N) for all employees.
- Complete the Remuneration during Shut Down (Column O) for all employees.
- Confirm all information is correct – especially monthly remuneration and sector minimum wage.
- Once you are satisfied that all is correct, remove line 2 in your excel sheet by right clicking on the line identifier and selecting delete:

- Once the headings have been removed you can click on File, Save As and select a directory where to save the file to.
- It is important that you save the file with the correct Name and as the correct type:
- File Name
The format for the file name is set by the department of labour as UIFreferenceNumber_DDMMMYYYY_uniqueno.
 EXAMPLE: If the uifregistrationnumber is 00000001/2 and date of sending file is 15-04-2020 and this is the first file you are sending then use 1 as unique file number then your file name will read: 000000012_15Apr2020_01
b. File Type: NOTE: The UIF Reference Number is the UIF Registration number from the system, is 9 digits in total and with the / before the last digit. It is the number without the U.
The file type needs to be set as CSV (Comma delimited):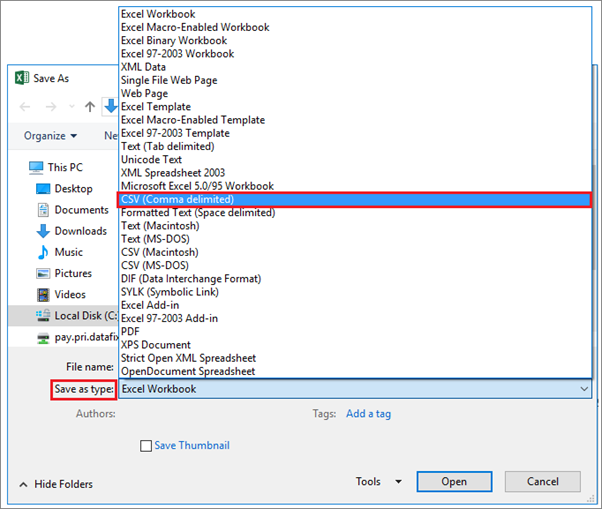
Once your File name is in the correct format you have selected your file type as CSV (Comma Delimited) you can click on Save.
- File Name
Submit your application:
Once you have successfully saved your CSV, you will need to submit this file and the other completed documents to the labour department. They will need to be emailed to [email protected] or submitted online.
 Africa
 Asia
Asia Australia
 Canada
 France
 Ireland
 Kenya
Kenya Nigeria
 Portugal
 Spain
Spain United Arab Emirates
 United Kingdom
 United States
 Germany